


How to Install Stacked Stone on an Interior Wall
Adding stacked stone to your interior walls can elevate the aesthetic of any room, providing a timeless, natural look. Whether you’re aiming for a rustic ambiance or a contemporary vibe, stacked stone is a versatile choice that enhances the value of your home. This guide will walk you through the detailed steps of installing stacked stone on an interior wall and provide essential tips for achieving a flawless finish.
Why Choose Stacked Stone for Interior Walls?
Aesthetic Appeal
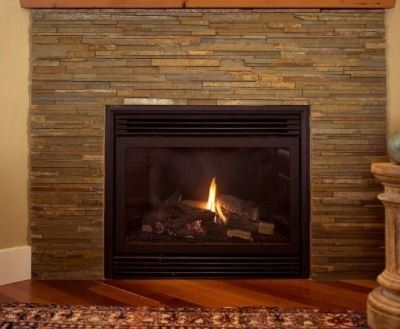
Stacked stone walls bring texture and depth to your interiors, creating a focal point that complements various decor styles. Whether you want a feature wall or a cozy fireplace surround, stacked stone in Madison, WI, is a stylish choice.
Durability and Versatility
Stacked stone is not only visually appealing but also highly durable. It can withstand wear and tear, making it an excellent long-term investment.
Easy Maintenance
Once installed, stacked stone requires minimal maintenance. Regular cleaning with a damp cloth can keep it looking pristine for years.
Tools and Materials Needed
Before diving into the installation process, gather the following tools and materials:
Tools
- Tape measure
- Level
- Notched trowel
- Tile saw or wet saw
- Rubber mallet
- Mixing bucket
- Safety goggles and gloves
Materials
- Stacked Stone Panels
- Mortar or adhesive (specific to stacked stone)
- Grout (if needed)
- Backer board (optional for uneven walls)
- Primer or bonding agent
- Sealer
Step-by-Step Guide to Installing Stacked Stone
Step 1: Prepare the Wall
Assess the Wall Condition
Ensure the wall surface is clean, dry, and free of dust or grease.
If the wall is uneven, consider using a backer board to create a smooth surface.
Apply a Bonding Agent
Use a bonding agent to improve adhesion between the wall and the mortar.
Let it dry per the manufacturer's instructions.
Step 2: Measure and Plan
Measure the Wall
Use a tape measure to determine the dimensions of the wall.
Calculate the number of stacked stone panels required, accounting for cuts and waste (typically 10% extra).
Dry Fit the Panels
Lay the panels on the floor to plan the arrangement.
Ensure the colors and textures are evenly distributed for a natural look.
Step 3: Cut the Panels
Use a Tile Saw
Cut the panels to size using a wet saw for clean, precise edges.
Always wear safety goggles and gloves during this process.
Test the Fit
Dry fit the cut panels on the wall to ensure proper alignment.
Step 4: Apply Mortar or Adhesive
Mix the Mortar
Prepare the mortar according to the manufacturer’s instructions.
Use a notched trowel to spread the mortar evenly on the wall, working in small sections.
Apply the Panels
Press each stacked stone panel firmly onto the wall.
Use a rubber mallet to ensure the panel is securely in place.
Check for level alignment after installing each panel.
Step 5: Seal the Stone (Optional)
Once the panels are installed and the mortar has dried, apply a stone sealer to enhance the color and protect against stains.
Tips for a Successful Installation
Work in Small Sections: Apply mortar to small areas to prevent it from drying before you place the panels.
Maintain Consistency: Use spacers for even gaps if grouting is required.
Trim Carefully: Take your time with corner cuts to ensure a professional finish.
Allow Proper Curing: Let the mortar cure for at least 24-48 hours before applying sealer or additional finishes.
Why Floors for Less?
At Floors for Less, we provide top-quality materials and expert advice for stacked stone installation in Madison. Our team ensures you have everything you need for a seamless project. Learn more about our products and services here: Stacked Stone Installation in Wisconsin.
Related FAQs
How much does stacked stone installation cost?
The cost varies depending on the size of the wall, type of stone, and labor charges. Contact us for a detailed estimate.
Can stacked stone be installed over drywall?
Yes, but using a backer board for added support is recommended, especially for heavier stone panels.
Do I need to grout stacked stone panels?
Most stacked stone panels are designed to be grout-free. However, consult the manufacturer’s guidelines for specific requirements.
How do I clean stacked stone walls?
Use a damp cloth or mild stone cleaner. Avoid abrasive materials that can scratch the surface.
Is sealing necessary for stacked stone walls?
Sealing is optional but recommended for areas exposed to moisture or stains, as it helps preserve the stone’s natural look.
Transform your interior walls with the elegance of
stacked stone
walls. For high-quality materials and expert installation services, visit Floors for Less today!