


Best Practices for Achieving a Flawless Tile Installation in Madison, WI
Tile installation is one of the most effective ways to enhance the beauty, durability, and functionality of any space, whether it's your bathroom, kitchen, or flooring throughout your home. When done correctly, a well-installed tile surface can last for decades and provide a clean, polished look that withstands the test of time. However, achieving a flawless tile installation requires attention to detail, the right materials, and adherence to best practices.
In this blog, we’ll guide you through the essential steps and best practices for tile installation, particularly in Madison, WI, where local factors such as climate and building materials come into play.
For professional services, visit Floors for Less for Tile Installation in Madison, WI.
Why Proper Tile Installation Matters
A correctly installed tile surface is more than just aesthetics. It’s about functionality, longevity, and minimizing long-term costs. Poor installation can lead to cracked tiles, water damage, and the need for premature replacements. By following best practices, you can ensure your tile installation stays beautiful and durable.
Preparing for Tile Installation
1. Selecting the Right Tile
Not all tiles are created equal, and choosing the right tile type for your specific needs is crucial. Tiles come in various materials, including ceramic, porcelain, natural stone, and glass, each suited for different spaces.
- Ceramic Tiles: Ideal for walls and low-traffic areas.
- Porcelain Tiles: Durable and water-resistant, perfect for floors and outdoor spaces.
- Natural Stone: Adds luxury and is ideal for high-end projects, though it requires more maintenance.
- Glass Tiles: Great for accents, backsplashes, and decorative elements.
2. Preparing the Surface
Before laying any tiles, the surface must be clean, dry, and level. Uneven or dirty surfaces can cause tiles to not adhere properly, leading to long-term issues.
- Leveling: Ensure the surface is flat to avoid uneven tile placement.
- Cleaning: Remove all dust, grease, and debris to ensure the adhesive sticks properly.
- Drying: Make sure the area is dry, especially in moisture-prone areas like bathrooms.
Installing the Tiles
1. Planning Your Layout
Before setting any tiles, it’s crucial to plan your layout carefully to avoid awkward cuts or misaligned patterns. Begin by measuring the space and marking a guideline that divides the area into manageable sections.
- Dry-lay the tiles: Lay out the tiles without adhesive to visualize the final pattern and avoid any surprises.
- Start from the center: Begin tiling from the center of the room or a key focal point to ensure symmetry.
2. Applying Adhesive
The type of adhesive you use depends on the type of tile and the location of the installation. A thin-set mortar is commonly used for most tile installations, but make sure to choose one that’s suitable for the type of tiles and the environment.
- Use a notched trowel: Apply the adhesive evenly using a notched trowel to ensure consistent coverage.
- Work in small sections: Don’t spread too much adhesive at once, as it can dry out before you place the tiles.
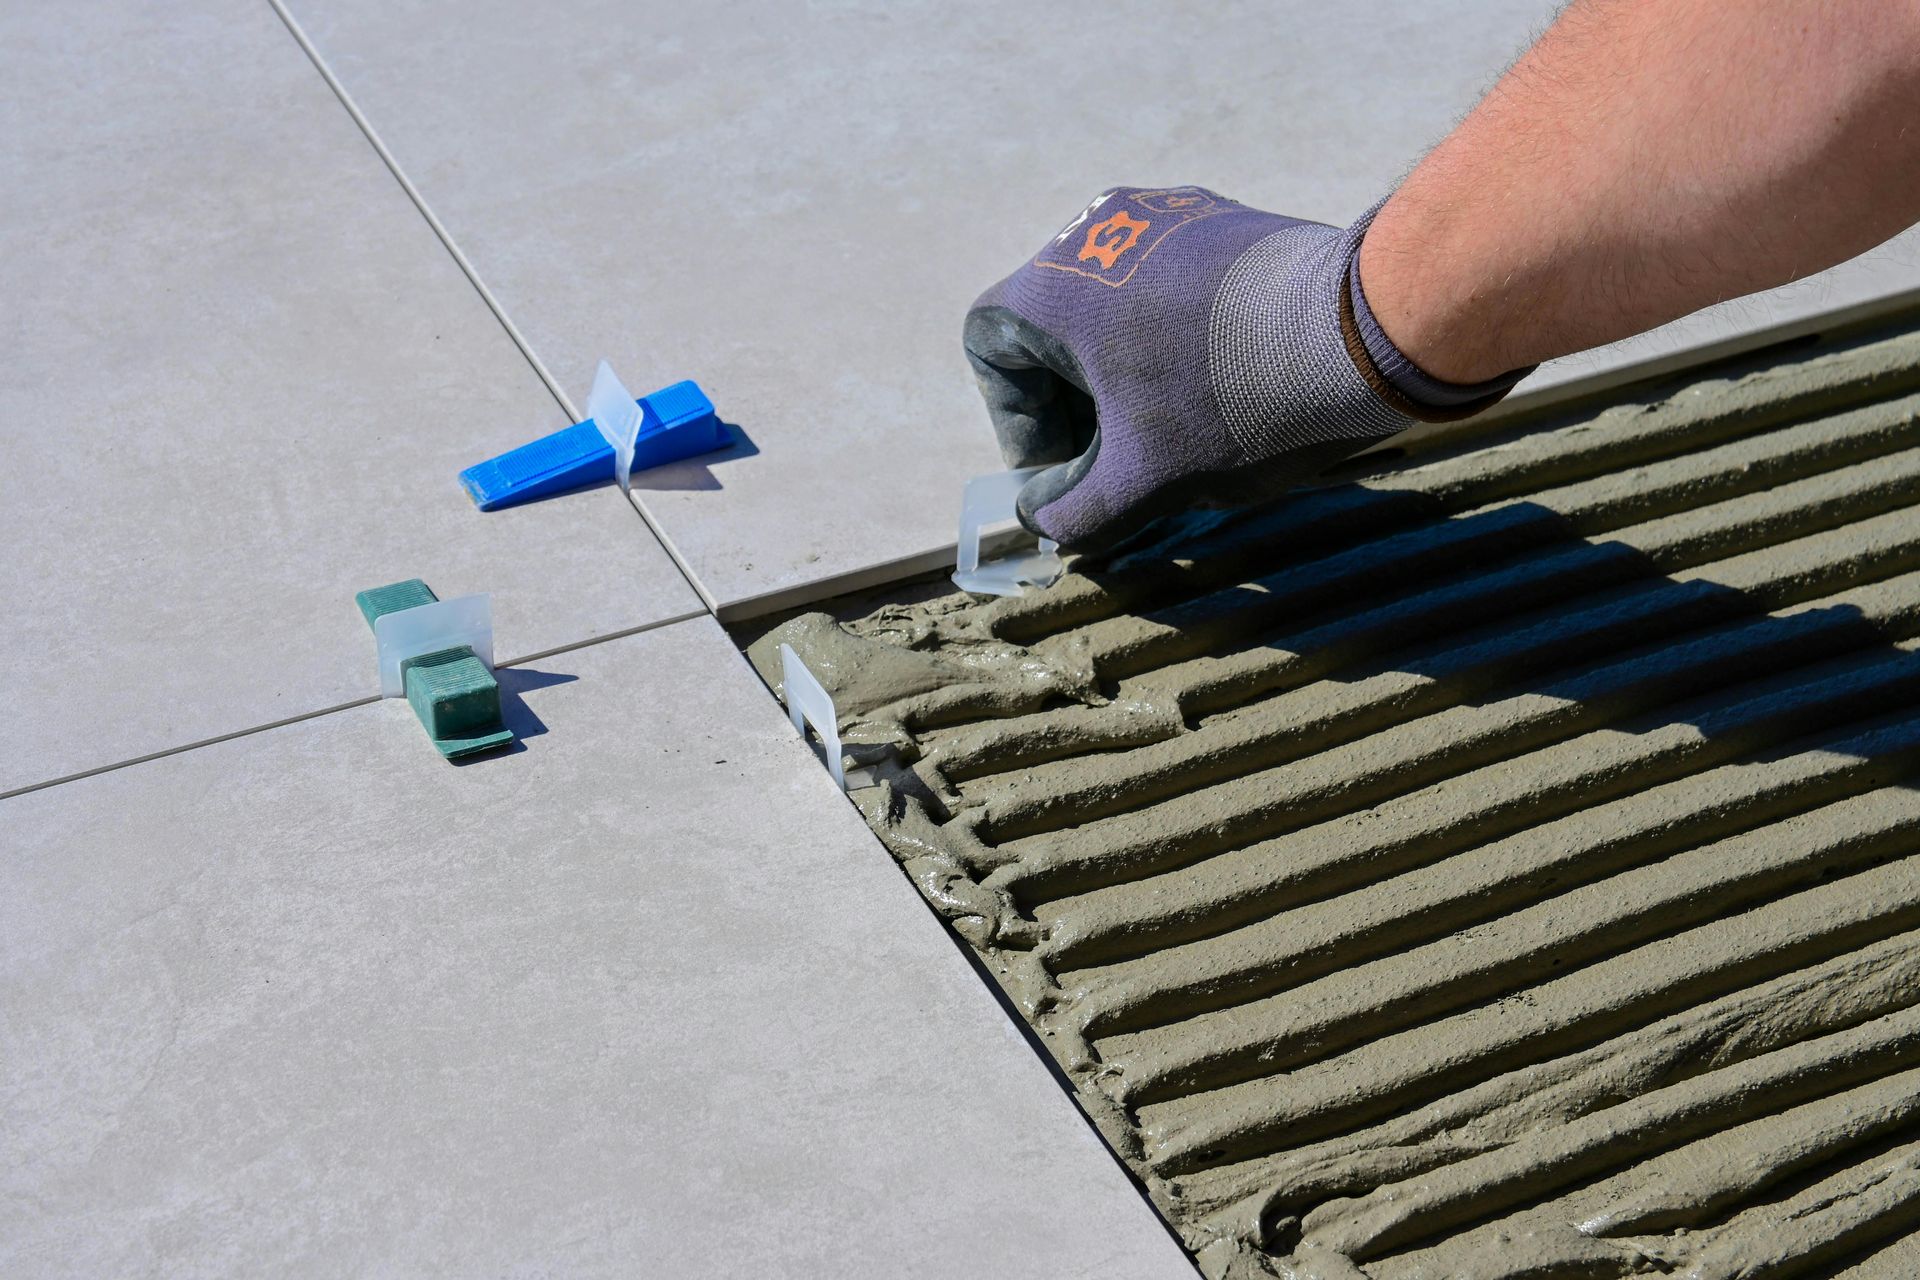
3. Laying the Tiles
Once your adhesive is applied, it’s time to start laying the tiles.
- Use tile spacers: To ensure even spacing between tiles, use tile spacers that match the desired grout width.
- Press and twist: Gently press the tile into the adhesive and twist it slightly to ensure a good bond.
4. Cutting Tiles
Inevitably, some tiles will need to be cut to fit around edges or obstacles like outlets and fixtures. Use a tile cutter or wet saw to make precise cuts.
- Measure twice, cut once: Accurate measurements are key to minimizing tile waste and ensuring a perfect fit.
- Smooth edges: Use a file or stone to smooth the cut edges to avoid sharp corners.
Final Steps
1. Grouting the Tiles
After the adhesive has dried (usually 24-48 hours), you can begin grouting the tiles. Grout fills the spaces between tiles and helps to seal the installation.
- Choose the right grout: Sanded grout is best for larger joints, while unsanded grout works for smaller gaps.
- Apply with a rubber float: Spread the grout over the tiles with a rubber float, holding it at a 45-degree angle to ensure the grout fills the gaps completely.
- Clean excess grout: Wipe away excess grout with a damp sponge before it hardens.
2. Sealing the Grout
Grout is porous and can absorb moisture, stains, and dirt over time. To protect your grout and tiles, apply a grout sealer once the grout has cured.
- Apply evenly: Use a small brush or roller to apply the sealer along the grout lines.
- Re-seal periodically: For high-traffic areas, reapply grout sealer every year to maintain its effectiveness.
Post-Installation Care
1. Allow for Curing
Allow your tile installation to cure properly before exposing it to foot traffic or moisture. This ensures the adhesive and grout set fully.
- Wait 24-72 hours: Depending on the adhesive and environmental conditions, wait at least 24-72 hours before using the tiled area.
- Avoid heavy loads: Don’t place heavy furniture or appliances on the tiles until fully cured.
2. Regular Maintenance
Maintaining your tile installation involves regular cleaning and care to preserve its appearance and integrity.
- Use gentle cleaners: Avoid harsh chemicals that can damage the tiles or grout.
- Seal regularly: Reapply grout sealer as needed to keep your tiles looking new.
Why Choose Professional Tile Installation in Madison, WI?
While DIY tile installation can seem tempting, hiring professionals ensures a flawless finish, saving you time, effort, and potential mistakes. At Floors for Less, our team specializes in providing high-quality tile installation in Madison using the best tools and techniques to deliver perfect results.
Frequently Asked Questions (FAQs)
What is the best type of tile for high-traffic areas?
Porcelain tiles are highly durable and ideal for high-traffic areas.
How long does tile installation take?
Depending on the size of the area, installation can take anywhere from 2 to 5 days, including drying time.
Do I need to seal my tiles?
While most tiles don’t need sealing, grout does. Sealing the grout helps protect it from stains and moisture.
How do I clean my tile floors?
Use a mild detergent and water to clean tiles. Avoid abrasive cleaners that could damage the surface or grout.
Can tiles be installed on uneven surfaces?
No, the surface must be leveled before installing tiles to prevent cracking and ensure a smooth finish.
By following these best practices, you can achieve a flawless tile installation that lasts for years to come. If you're looking for expert tile installation in Madison, WI, be sure to contact Floors for Less for professional services that deliver stunning results every time.